A few weeks ago, the girls were playing Guitar Hero but the drummer kept on failing the band. We eventually discovered that the red snare drum was not working very well. Well, if you hit it REALLY hard, it registered. I started looking around for the receipt, but I couldn’t find it! This is the second thing that has gone wrong with the instruments – I have already had a faulty strum switch on the guitar.
I did a bit of Googling and found that many people have the same problem with the red snare drum. I guess it’s one of the drums that’s hit the most, so it’s one of the first to go. Without the receipt, I thought I was stuffed.
However, I found that Activision has released a Drum Tuning Kit that can be used to tune the sensitivity of the drums, through its MIDI input. To connect your PC to the drums, you need a MIDI connection and Activision will supply a USB to MIDI cable if you have the receipt. Great… no receipt. But I do have other MIDI PC equipment, so I tried using my M-Audio FireWire 410 audio interface and it worked!
Well, the software worked but no matter what setting I used, the red drum was still not working reliably. A soft or medium hit just would not register.
After a bit more googling, I found a discussions on fixing the drums yourself. Apparently, it’s usually the case of a bad wire connection to the sensor of the red drum. So, on the weekend, one of my projects was to fix the red drum.
Note that if you want to do this, you will most definitely void your warranty. These steps may or may not work for you and I take no responsibility for your success/failure!
First, turn the drums over. We’ll be taking the bottom (back) off the drum kit off. Get a screwdriver with a star head and unscrew everything in sight!

Be aware that some of the screws are slightly different from the others. I found that screws in A and B locations in the diagram below were different.

Be careful when unscrewing the screws that hold the control box to the drum kit. The drum control box will come apart.

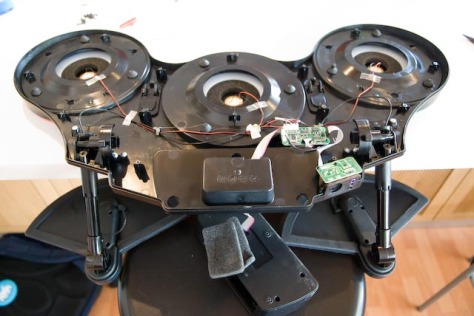
Once all the screws have been removed, carefully lift off the cover (which is the back). You will see the guts of the drum kit.

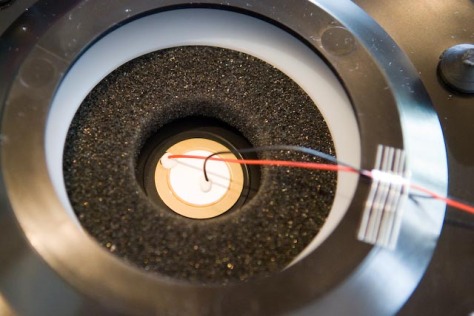
The red snare drum is the one on the left. You can see a pair of wires running from the sensor to a small circuit board. The problem most people seem to have is that these wires don’t have good contact with the sensor.

Very very gently, I pulled the red wire to see how strongly it was held down. And unbelievably, the wire just pulled right off with hardly any effort! No wonder I was having a problem with the red drum.

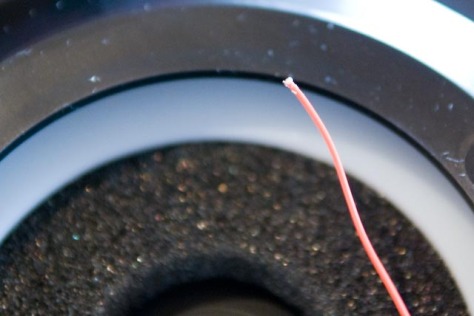
So I cleaned off all the glue from the wire and the sensor. I stripped the red wire back about 5mm, got out the soldering iron and solder and joined it back to the sensor. Be careful not to make the red wire contact the centre part of the sensor.
I also took the opportunity to pull a bit of the red wire so that there’s more slack near the red drum kit area. It seemed a little “tight” there.

After I soldered it, I gently tapped on the sensor on the back and made sure it registered in Guitar Hero. (Tip: enter the Music Studio in Guitar Hero World Tour and lay down a new drum track – it’s the easy way to check whether the drums are working.) It worked like a charm! I didn’t need to fix the black wire at all.
Then it’s just a case of putting the back cover on again and screwing all the screws in.
No need to post the drums away and wait 2-6 weeks to get it back from Activision!
Here’s a few other links with step by step guides:
http://www.goodinput.com/2008/10/27/guitar-hero-world-tour-drum-fix/
http://www.lookatbowen.com/red-drum-faulty-on-guitar-hero-world-tour/
MI PLATO NARANJA NO FUNCIONA EPRO SI LO CAMBIO AL LUGAR DEL ROJO SI FUNCIONA Y EL ROJO EN EL LUGAR DEL NARANJA NO FUNCIONA QUE PODRA SER LA FALLA EMAIL VAMPIRO_EVC@MSN.COM
I don’t quite understand – is it the orange cymbal that’s not working? There are some other people who have fixed cymbal problems but I haven’t had one of the cymbals fail yet.
Well, consider yourself lucky. If your feeling left out break it. What the hell? This is for repairs which you obviously don’t need , so keep your pie hole shut!!!
mi tambor rojo tampoco funciona correctamente. sospecho que el sensor se ha desprendido de donde debe ir. esta tarde me he propuesto arreglarlo y estoy convencido de que lo haré.
ya les contaré lo que sucedió.
Thanks for this! Worked a treat.
ROb
Thanks for this, it really helped.
Ater hot glueing, calibrating and finally slodering, my red pad finally works.
I had never soldered before but it wasn’t too difficult.
Guillermo, Rob and Joe – Thanks for the comments. I’m glad I could have helped in some way.
All – I’d only recommend doing this if:
1) Your drums are out of warranty OR
2) Your drums were working at some stage and then stopped working
If the drums never worked from when you bought it, I’d recommend returning the drums under warranty.
Fo those of you looking for the Yellow Cymbal failure issue, I found that it was the audio head that plugs into the Cymbal which was bad and preventing this from functioning. I am planning on purchasing a mon audio head from Radio shack to repair it myself since my system is out of warranty. Cheap designs and low cost labor means it is warrantied for 90 days because this is how long it lasts.
I have fixed my red drum pad numerous times. I have used both the solder method, the Popsicle stick method and the hot glue method. Each seems to fix it temporarily. I have figured the problem is the sensor (transducer) is cheap and not attached to the wires or the drum head well. I only use the Guitar Hero drums to play rock band. Here is the fix I did today and it works better than the other methods and it’s permanent (I hope.)
I bought a piezo treansducer from Radio Shack (part #273-0073; $1.99 USD) and pulled the wires off the old sensor. I then used two Popsicle sticks to attach the piezo sensor right on top of the old one. Hot glue would probably work, too. Attach the two new transducer wires to the old wires with solder or electrical tape and now you have a new, much sturdier sensor. It works perfect with Rock Band and it senses a hit anywhere on the pad, but not near misses. No double-hits either! I haven’t tried it on Guitar Hero, so I don’t know if it distinguishes between light taps and hard hits. Hope this helps for anyone thinking of spending $100 on a new set.
Just checked it on GHWT. It senses the difference between soft and hard hits just fine.
my red snare had broke and i opened it up and the red cable was already loose lol
hey thanks alot, just did the fix on the red drum. worked a treat
My red snare drum didn’t work either. I decided to open it up and have a look, and then to find that the red cable had snapped off. How could it of done this? Anyway I pulled off the white glue stuff and decided to solder it back on. However, this only worked temporarily. So, I opened it up again to find it had broken off again. Useless! By this time I had just got fed up with the whole situation. Using Google I found this website and had discovered that this guy did the exact same as me. But still puzzled how it keeps breaking off. I have Smash Hits arriving and desperate to get the drum kit ready, but there is just no solution. Help me! Should I try super glue?
Michael, 15 🙂
Are you sure you’re not pulling it off when you’re removing the casing? I’d recommend soldering it again, and if the wire is too short/tight, maybe buy some electrical wire from your local electronics store to lengthen it a bit.
Hola, me pueden decir como se conectan los tambores? creo que me faltó un accesorio para conectar los tambores, pero no he encontrado algun diagrama de conección en internet.
@Ramon – do you mean connect the drums to the PS3? There is no wire – it’s wireless. I’m not sure where you bought yours, but it should have come with a USB dongle that you stick into the PS3. This communicates with the drumset wirelessly.
Hola a Todos , necesito urgentemente DONDE COMPRAR LOS SENSORES DEL PAD de la bateria de guitar hero ya que se me rompio.
Ayudenme!!!!!!DONDE LO CONSIGO
@Jesus – Sorry, I’m not sure where to buy the actual sensors from. I’d strongly recommend sending your drumkit back to the manufacturer’s if there’s a fault like this.
i have had severe problems with my kit. i am a homed trained electrician and i fix multiple electronics around my house and when my drumset broke, it was not the red one(yet) but the orange cymbal. the wire had snped very close to the little end tip thing and was impossible so solder back on, so i had to replace the whole tip. then my blue drum broke, and i fixed it the same way mentioned here, exept, when i solder the wire back on to the disk thing, i cover it with a drop of hot glue so it gives the wire a little more flexibility so it wont break off again. i have had to fix every single color on the drums, exept green. im going to buy a new one and just replace the whole wiring system to be more durable.
@Donny I’m disappointed that the quality of the wiring seems so bad in the drumkits 😦 My yellow cymbal just “broke” 2 days ago – I’ll have to fix that one soon and blog it.
can i use any type of glue? i really dunno how to solder it. would it work just using glue?
@neto No, you can’t use glue. Glue will not complete the electric circuit, whereas solder will. Probably best to Google or look up YouTube for some how to’s. I found a few here: http://www.youtube.com/watch?v=BLfXXRfRIzY and http://www.youtube.com/watch?v=0cl5QI4pqKc&feature=fvw. Hope this helps.
tks a lot jasechong. 🙂
Just had the same problem on my red snare as described here and in multiple other places – ie. it worked if I hit it really hard and in exactly the right place, but anything else got no reponse.
On taking the back off the drum kit, I discovered that the black wire wasn’t even slightly attached and that a quick (2 minute) soldering job has the drum functioning perfectly again. While I was in there, I also taped ALL the wires on all pads firmly in place to hopefully prevent the problem reoccurring.
Shame on red octane/activision for releasing such crappy gear (seriously, this stuff is MEANT to be hit hard, it should have better connections), but thanks Jason for saving me a headache.
As it stands, my wife can play the drums again and with a bit of luck she’ll be very grateful later on. If you know what I mean 😉
A note to would-be repairers: There are a ridiculous number of screws in the kit and they’re all TORX-head (6-pointed star) screws, so make sure you have the right screwdriver before you start or you’ll get very frustrated.
Hi Jasechong,
Thanks for the website mention and a word of warning (good warning)… with Christmas and holidays on the way, be prepared to be bombarded with questions, because there will be many new people with drum kits this year and guess what, the problem still exists almost a year and a bit later.
ha ha ha!!!! but your site and photos and instructions are awesome and you are a blessing to a lot of frustrated people…
Cheers,
Mike of Lookatbowen.com
P.S. Did I say your website is awesome!!!! – I’ve been reading loads of posts.
Can anybody tell me where I sign up for the RSS feed? I’m kind of new to all of this, but a friend had mentioned this. Thanks for any help.
@BluesGuitar Thanks for visiting. On the top right of the page are the words: “Feeds:” and then there is one for Posts and one for Comments.
Click on “Posts” and then depending on your browser, you might see an option that says “Subscribe to this feed” after that. Hope this helps!
Thanks for the walkthrough, didn’t work for me I’m afraid as it was the other wire that came off mine and I cannot solder. Its more expensive but I found a repair kit where you can just change the whole sensor assemsbly so I went with that. Cant remember where it was but you can find it by searching for SOLDERLESS DRUM REPAIR KIT in google
http://directv-systems.com/?p=279
Hey, I have a problem with the snare too…every time I hit it counts as a doble hit…and it is impossible to play like that…can anyone tell me if the problem is the same? thanks
Omar – you may need to reduce the sensitivity of the snare drum using the Midi kit. Have you tried this yet?
Thanks 🙂
Hi, I just wanna thank you so much for posting this guide for repairing the red drum. I bought the instrument set in the US and then brought it back to my country (Brazil). After some days I noticed that the red drum wasn’t working at all. I even thought about opening the whole device and trying to figure out what was wrong, but fortunately I found your blog and thus I could have a better guidance for fixing my drum.
I’m having a lot of fun now!
Thanks a lot!
Awesome, thanks. That worked a treat. Back in business! I suspect this kit will need more of these repairs too – those wires are awfully fragile for a drum kit…
You wrote about a number of curious points on this page. I came across it by using Msn and I have to admit that I already subscribed to your website, it is quite decent (;
Evalyn – thanks!
Evalyn – thanks!